Feature
●Perfect for Curved Dashboards: Engineered to create a flat mounting area on curved or textured surfaces, these adhesive disks provide a strong foundation for suction cup car mounts. Enjoy a smooth, flat surface that enhances the suction grip of your phone holders, GPS Navigators, and dash cams for a secure and stable hold.
●High-Performance Adhesion: Equipped with 3M VHB (Very High Bond) technology, this dashboard mounting disk set offers superior stickiness that ensures your car mounts stay firmly attached to the dashboard, providing a reliable hold even through rough driving conditions.
●Enhanced Compatibility: The 3M VHB Adhesive Dash Pad is designed for versatility, with a 3.74-inch (95mm) diameter thats ideal for a wide range of suction cup car mounts.
●Designed for Convenience: This set includes two mounting disks and two extra replacement sticky pads, giving you a total of four pieces for multiple applications or devices. A specially crafted tab on the red release film guarantees swift and simple peeling without the need for tools, making the setup hassle-free.
●Reliable and Maintainable: Made to withstand both hot and cold conditions, the adhesive maintains its hold without warping or weakening, ensuring your devices remain secure.
Description
Premium Dashboard Mounting Disk for Suction Cup Holders


This mounting disk transforms your vehicles dashboard into a reliable platform for your car phone holders, GPS navigators, and dash cams.
4 Simple Steps for Secure and Easy Installation

Clean the Dashboard Area
Ensure the intended mounting area on your dashboard is thoroughly cleaned for effective adhesion.

Attach Mounting Disk
Carefully peel off the backing from the disk and firmly press it onto the cleaned surface for 30 seconds.
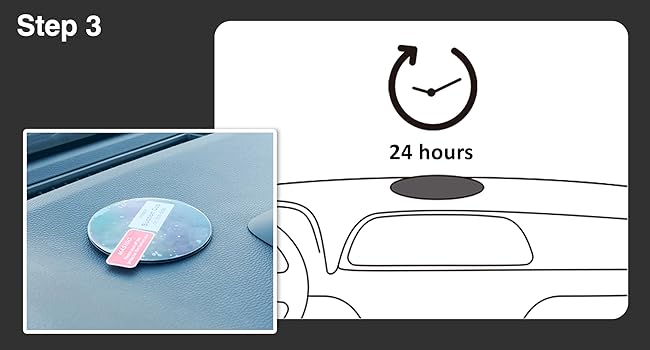
Wait for 24 Hours
Leave the disk to bond with the dashboard for 24 hours to achieve optimal adhesive strength.
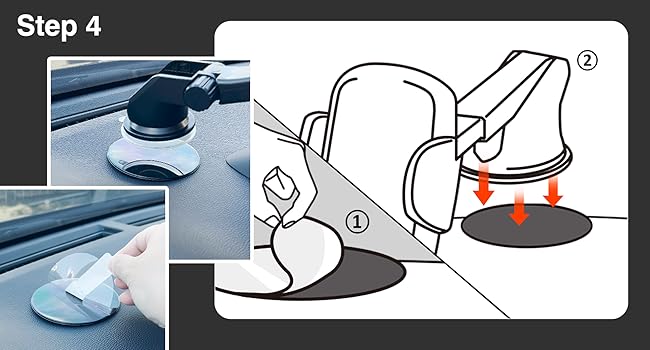
Attach Your Suction Cup Car Mount
After the waiting period, attach your suction cup car mount to the center of the disk.
4 Easy Steps for Safe and Efficient Removal

Apply Heat
Loosen the suction cup first, and use a hair dryer to apply gentle heat around the edges of the disk to soften the adhesive. Be cautious not to overheat the area.

Slide Dental Floss or Fishing Line
Gently slide dental floss or fishing line behind the disk. Use a sawing motion to cut through the adhesive layer.

Pry the Disk Off
Use a plastic pry tool to gently lift the disk off. Start at an edge and slowly work your way around the disk.

Clean the Surface
- Use a soft cloth or sponge to gently scrub the area and remove any remaining adhesive residue.
- clean the surface with a suitable cleaner depending on the dashboard materials to remove any remnants of the adhesive or cleaning solution.