Feature
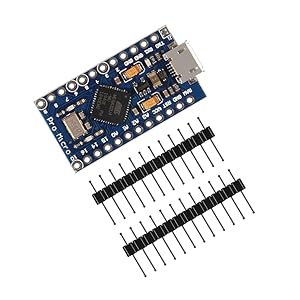
●ATmega32U4 running at 5V/16MHz
●Supported by IDE v1.0.1
●Rx and Tx Hardware Serial Connection
●4 x 10-bit ADC pins, 12 x Digital I/Os
●On-Board Micro-USB connector for programming
[Type-C USB]

[Micro USB]

[10PCS Micro USB]

Description

|
|
|
|
|---|---|---|
|
Features: ATmega32U4 running at 5V/16MHz Recommend power supply for board: 6-7V, less than 9V On-Board micro-USB connector for programming 4 x 10-bit ADC pins, 12 x Digital I/Os Rx and Tx Hardware Serial Connections |
Description: 1. The Pro Micro is similar to the Pro mini except with a ATmega32U4 on board. The USB transceiver inside the 32U4 allows us to add USB connectivity on board and do away with bulky external USB interface. 2. This tiny little board does all of the neat-o for for tricks that youre familiar with: 4 channels of 10-bit ADC, 5 PWM pins, 12 DIOs as well as hardware serial connections Rx and Tx. Running at 16MHz and 5V, this board will remind you a lot of your other favorite boards but this little guy can go just about anywhere. If youre supplying unregulated power to the board, be sure to connect to the "RAW" pin on not VCC. |
Package Includes: 4 x Pro Micro ATmega32U4 5V 16MHz Module |


How to use? 1. Connected to computer. (If this module cannot be recognized by your computer, please refer to this link to install the driver) 2. Opened Ard IDE and loaded Blink sketch. 3. Set board to Leonardo and selected the appropriate COM port (It showed up in the list already identified as a Leonardo). 4. Connected an LED to pin 9 and modified the sketch accordingly. 5. Hit upload and within a few seconds having a blinking LED.