Feature
●【Solar Sensor】Sensor is weatherproof, comes equipped with a rechargeable battery and solar panel, has 3 sensitivity levels, and the detect light can be turned ON/OFF for privacy.
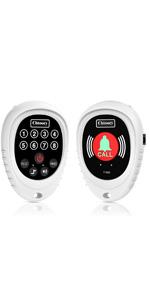
●【Smart receiver】Receiver can be used with batteries on-the-go, has a low power indicator and caller display, 4 volume levels(the lowest volume is mute), and 12 different chimes available.
●【100% Satisfaction】Love it or your money back! We provide a lifetime service for Chtoocy Driveway Alarm. Package equiped with quick start Qguide and detailed manual.
●【Super Easy】The new design makes it easier to set sensitivity and easier to uninstall the sensor and charge it.The sensor can keep working for about 12 months after a full charge.
●【Stable Signal and Expendable】A super long range of up to 3000 ft with stable signal.Special code matching technology to avoid interference.Expendable, system can expand to include up to 8 sensors and more receivers; system automatically detects expansion range.
[1 Sensor 1 Receiver]

[2 Sensor 1 Receiver]

[4 Sensor 1 Receiver]

Description


|

|

|

|
|
|
|---|---|---|---|---|---|
| 1 Sensor & 1 Receiver | 2 Sensor & 1 Receiver | Receiver | Sensor | Call button & Receiver | |
| 5V Adapter & Charging Cable Quantity | Adapter * 1 , Charging Cable * 2 | Adapter * 1 , Charging Cable * 2 | Adapter * 1 , Charging Cable * 1 | Charging Cable * 1 | |
| Battery Life | the sensor can keep working for about 12 months after a full charge | the sensor can keep working for about 12 months after a full charge | the sensor can keep working for about 12 months after a full charge | the sensor can keep working for about 12 months after a full charge | |
| Unit Size | Sensor 3 * 2.8 * 3.5 inch & Receiver 4.3 * 4 inch | Sensor 3 * 2.8 * 3.5 inch & Receiver 4.3 * 4 inch | Sensor 3 * 2.8 * 3.5 inch & Receiver 4.3 * 4 inch | Sensor 3 * 2.8 * 3.5 inch & Receiver 4.3 * 4 inch | |
| Caller Id Number To Display & System Expandability | Up to 8 Sensors per Receiver & Unlimited Receivers | Up to 8 Sensors per Receiver & Unlimited Receivers | Up to 8 Sensors per Receiver & Unlimited Receivers | Up to 8 Sensors per Receiver & Unlimited Receivers | |
| Maximum Communication Distance | Transmission Range Up to 3000 Ft & PIR Sensor Detection Range 0-30 Ft | Transmission Range Up to 3000 Ft & PIR Sensor Detection Range 0-30 Ft | Transmission Range Up to 3000 Ft & PIR Sensor Detection Range 0-30 Ft | Transmission Range Up to 3000 Ft & PIR Sensor Detection Range 0-30 Ft | |
| Detection Rotation Angle | Detection Horizontal Angel 90 degrees & Detection Vertical Angel 60 degrees | Detection Horizontal Angel 90 degrees & Detection Vertical Angel 60 degrees | Detection Horizontal Angel 90 degrees & Detection Vertical Angel 60 degrees | Detection Horizontal Angel 90 degrees & Detection Vertical Angel 60 degrees | |
| Detect Light can be Turn Off | ? | ? | ? | ? | |
| Solar Panels & Weather Proof | ? | ? | ? | ? | |
| Low Power Indicator & Sensor Easy to Set Up | ? | ? | ? | ? | |
| User Guide & Exquisite Packaging | ? | ? | ? | ? |

