Feature(may vary by option.)
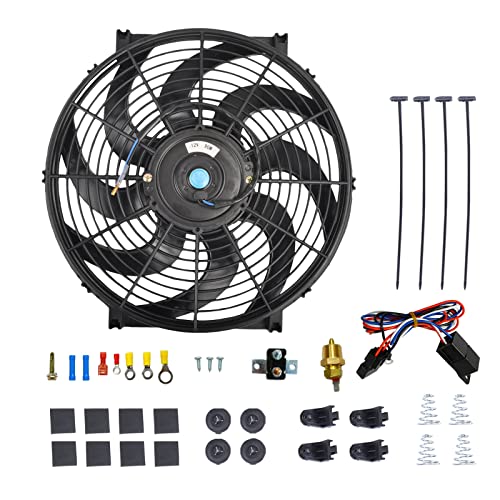
●✅【Radiator Cooling Fan】 12V 120W 16 Inch radiator cooling fan with mount brackets and tie straps kit. Auxiliary equipment for cooling the entire engine compartment, including radiator, A/C system, intercooler, oil system, and transmission
●✅【Slim & Push/Pull Design】Slim design provides excellent engine bay clearance for engine modification. Direct bolt-on installation and also reversible. It can be used as a puller.
●✅【Powerful Specification】 Maximum Fan CFM: 1000 CFM; Maximum Fan RPM: 2000±10% rpm; Blade Length:16 Inch; Number of Blades: 10 Blades; Blade Type: S-Curved. Overall Diameter:16.82 inch, Overall Thickness:3.27 inch ;Amp Draw: ≤11 amp ;Watts:120W.
●✅【Thermostat Wiring Switch Relay Kit】Activates by grounding electric fans at preset temperature,180F turn-on temperature, 165F turn-off temperature,Probe typically threads into radiator, water outlet or manifold.
●✅【Universal USE】Radiator cooling fan fit various vehicles and engines. Check the size of your radiator. If you have any questions while using it, please feel free to contact us. We will provide you with satisfactory service.
[12 Inch]

[10 Inch]

[14 Inch]
[16 Inch]

Description


16" Radiator Fan

Thermostat Wiring Switch Relay Kit
- 1× 3/8” NPT Thread-in Thermostat
- 1× 1/2" NPT Adapter
- 1× Wiring Harness w/ Mount
- 1× 60 Amp Relay ;1× 30 Amp Circuit Breaker
- 3× Small Ring Terminals ;1× Large Ring Terminal
- 1× Harness Mounting Screw
- 2× Butt Connectors ; 1× Female Connector
- 2× Sheet Metal Screws
- Activates by grounding electric fans at preset temperature.
- 180F turn-on temperature, 165F turn-off temperature.
- 3/8" NPT thread-in brass probe w/ 1/2" NPT adapter included.
- Probe typically threads into radiator, water outlet or manifold.
16" Electric Radiator Cooling Fan
With Thermostat Wiring Switch Relay Kit
- The cooling system of your automobile is vital to your engines overall health and longevity. Without proper cooling, your engine can crack and seize up, which can lead to engine damage.
- To save your energy, time and money, get the superior OEM parts BATONECO offer for your vehicle. Each product is made from high quality materials to maintain proper cooling of your engine and prevent overheating.
- Universal 12v high performance 16" inch electric radiator cooling fan.
- Upgraded 120 watt motor draws 11 amps, producing over 1000 CFM
- Configured as an air puller by default or reversible to an air pusher.
- Includes thermostat wiring switch relay kit and complete cooler fin tie strap kit.
- Measures 16.82"x 16" x 3.2" thickness at center and 1.4" at edge.


|

|

|

|

|
|
|---|---|---|---|---|---|
| 7" Radiator Fan | 10" Radiator Fan | 12" Radiator Fan | 16" Radiator Fan | 16" Radiator Fan WithThermostat Wiring Switch Kit | |
| Customer Reviews | 196
| 196
| 196
| 196
| 39
|
| Price | $21.88 | $22.88 | $24.88 | $34.99 | $39.99 |
| Fan Diameter | 7" | 10" | 12" | 16" | 16" |
| Thickness | 2.64" | 2.36" | 2.36" | 3.27" | 3.27" |
| Number of Blades | 10 | 6 | 10 | 10 | 10 |
| Watts | 80 | 80 | 80 | 120 | 120 |
| Amp Draw | ≤5 | ≤6 | ≤7.5 | ≤11 | ≤11 |
| Maximum Fan RPM | 2900±10% | 2400±10% | 2000±10% | 2000±10% | 2000±10% |
| Maximum Fan CFM | 800 | 800 | 800 | 1000 | 1000 |

|

|

|

|

|

|
|
|---|---|---|---|---|---|---|
| 7 Radiator Fan 2PCS | 10" Radiator Fan 2PCS | 12" Radiator Fan 2PCS | 10" Radiator Fan WithThermostat Wiring Switch Kit | 12" Radiator Fan WithThermostat Wiring Switch Kit | 14" Radiator Fan WithThermostat Wiring Switch Kit | |
|
|
|
|||||
| Customer Reviews | 196
| 196
| 196
| 39
| 39
| 39
|
| Price | — | — | $37.88 | $29.99 | $32.99 | $36.99 |
| Fan Diameter | 7" | 10" | 12" | 10" | 12" | 14" |
| Thickness | 2.64" | 2.36" | 2.36" | 2.36" | 2.36" | 2.64" |
| Number of Blades | 10 | 6 | 10 | 6 | 10 | 8 |
| Watts | 80 | 80 | 80 | 80 | 80 | 90 |
| Amp Draw | ≤5 | ≤6 | ≤7.5 | ≤6 | ≤7.5 | ≤9.5 |
| Maximum Fan RPM | 2900±10% | 2400±10% | 2000±10% | 2400±10% | 2000±10% | 2000±10% |
| Maximum Fan CFM | 800 | 800 | 800 | 800 | 800 | 900 |
Factory setup is for PULLER applications

This fan assembly is designed for both PUSHER and PULLER applications.To change airflow direction from the factory setting,you MUST follow the directions below or performance will be compromised!
Warning: Installation of accessories should only be undertaken by those with mechanical knowledge and are familiar with working on vehicles,Always use eye protection (goggles,safety glasses or shield). Park the vehicle in a well lit area,on level ground and apply the parking brake.Only work on a cold vehicle that has bean sitting overnight, failure to do so will result in severe burns and injury.Before starting the vehicle,make sure no tools or any other items are left under hood that could interfere with or be drawn into moving parts of the engine.
MOUNTING FAN
|
|
|
|
|
|---|---|---|---|
STEP 1Take the four mounting feet provided and attach them to the slots on the outside of the fan housing at the desired locations around the perimeter. Please Note: Tensioner springs included,(not pictured) is optional. For use with mounting rods prior to placing through mounting feet. Tensioner Springs not necessary for mounting fan(s)to radiator. |
STEP 2Position the Fan Assembly against the radiator or air conditioning condenser. Take the four Mounting Rods and carefully install them through the Mounting Feet and then though EITHER the radiator or air conditioning condenser. Take the four 1 x1 Foam Pads and remove the paper backing.Now installation them(sticky side toward the core) onto the Mounting Rods now protruding through the radiator or air conditioning condenser. Take the four Mounting Clips supplied and install them onto the Mounting Rods.The mounting Clips can only be used one time,so make sure the Fan Assembly is in the correct location. Secure Mounting Clips until 1x1 Foam Pads are slightly compressed.Cut off any excess Mounting Rod. |
STEP 3The Electric Fan Assembly can be activated using a Manual Switch or Relay Wiring Kit,For Relay Wiring Kit, Reference the product label on the Electric Fan to determine the Positive(+) and Negative(-) wire colors. Important:For Puller applications use the referenced wire colors stated. For Pusher applications the two wires MUST be reversed to change airflow direction. |
STEP 4Standard NPT sized solid brass thread-in temperature probe sensor. Threads into block port, radiator, engine cooler or tapped hose line. Measures temp of any liquid including oil, water and coolant fluid. |


