Feature
●【Application】Compatible with Craftsman Devildiss Dewalt ,Black and Decker, Bostitch. Does not fit any 2 cylinder units.
●【Fits for DeWalt models】 D55146 , D55167 , D55168 All types numbers. 【Fits for Bostitch models】CAP1615-OF Type 0, CAP1645-OF Type 1 【Fits for Black and Decker models】919-16760,919-16762,919-16761,919-16763. Please contact us if you are not sure whether this kit fit your air compressor.
●【Material】The kit is constructed from high mechanical strength 6061 Aluminum and rubber, ensure the kit no cracks and longterm service for your air compressor..
●【Package Includes】1 x Connecting Rod, 1 x Piston Ring, 1 x Cylinder Sleeve, 2 x O-Ring that go on the valve plate. Replacement Part No: N038785 N021229 N021725
●【Satisfaction Guarantee】 If youre not 100% satisfied with our product, simply return it for a full refund in 30 days. Support 12 months’ Warranty.
Description


WHY YOU NEED THIS?
- The air compressor motor drives a piston that compresses air in the pump cylinder to fill the compressor tank. Worn pump parts— such as the valve plate and seals—stop the pump from compressing the air and filling the tank. Rebuilding the air compressor pump restores the pumps ability to efficiently compress air.
- If the tank wont build pressure because the pump seals or valve plate are worn, rebuild the pump using the manufacturer-approved air compressor parts. Most air compressor models use a kit for rebuilding the air compressor pump. The rebuild kit includes the cylinder sleeve, connecting rod, piston ring and o-rings.

- Includes: Connecting Rod, Compression Ring, Piston Rod Cap, Piston Rod Cap Screw, Cylinder Sleeve, Valve Plate to Cylinder Sleeve O-Ring, Cylinder head O-Ring & Service instructions for replacing connecting rod kit.

Great Compatibility
- Compatible with Dewalt, Bostitch and Black&Decker
- Fits for the following models:
- 919-16755 Type 0, 919-16755 Type 1, 919-16760 Type 0, 919-16761 Type 0, 919-16762 Type 0, 919-16762 Type 1, 919-16763 Type 0, 919-16763 Type 1, 919-16770 Type 0, 919-16770 Type 1, 919-16771 Type 0, 919-16771 Type 1
- CAP1615-OF Type 0, CAP1615-OF Type 0, CAP1645-OF Type 1, CAP1645-OF Type 1,
- D55146 Type 1, D55146 Type 2, D55146 Type 2, D55146 Type 3, D55146 Type 3, D55146 Type 4, D55146 Type 4, D55146 Type 5, D55146 Type 5, D55167 Type 1, D55167 Type 1, D55167 Type 2, D55167 Type 2, D55167 Type 3, D55167 Type 3, D55167 Type 4, D55167 Type 4, D55167 Type 5, D55167 Type 5, D55168 Type 1, D55168 Type 1, D55168 Type 2, D55168 Type 2, D55168 Type 3, D55168 Type 3, D55168 Type 4, D55168 Type 4, D55168 Type 5, D55168 Type 5, D55168 Type 6, D55168 Type 6, D55168 Type 7, D55168 Type 7, FMFP70978 Type 1

Function
- To rebuild a piston cylinder in the compressor. You can replace o-rings on valve plate , cylinder sleeve , connecting rod and piston ring in the compressor.
- It is recommended that you release air and unplug the air compressor before you install this kit. You will need a wrench set to replace this part.
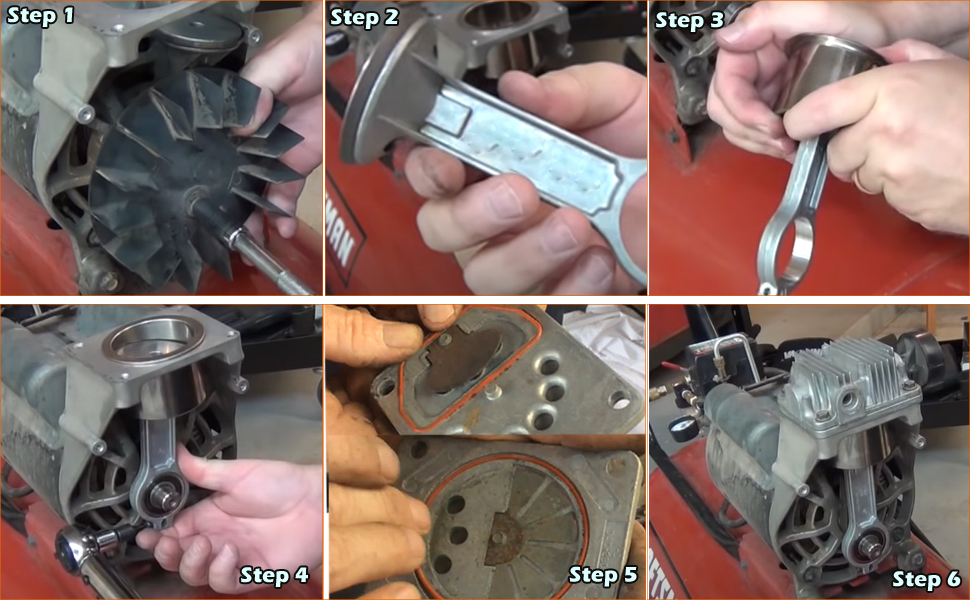
Installtion Guide
Step 1. After disassemble the pump head, Remove the fan mounting bolt and pull the fan off
- Remove the piston and old sleeve.
Step 2. Install the new compression ring
- Place the new compression ring on the top of the piston. Reinstall the piston cap and Torx screw.
Step 3. Insert the piston rod into the sleeve.
- Slide the piston into the new cylinder sleeve. Insert the piston and cylinder sleeve into the pump body.
Step 4. Reinstall the piston and the fan
- Push the piston connecting rod onto the eccentric bearing. Align the piston connecting rod flush with the eccentric bearing.
- Tighten the piston connecting rod Torx screw to 48 inch-pounds using a torque wrench
Step 5. Replace the both new valve plate seals on the valve plate assembly, then cover to the piston back.
- Install the new upper valve plate seal. Install the new lower valve plate seal.
Step 6.Reinstall the pump head mounting bolts.
- Position the pump head over the new valve plate with the muffler side of the pump head over the reed valves on the valve plate.