Feature(may vary by option.)
●Stainless steel contact paper
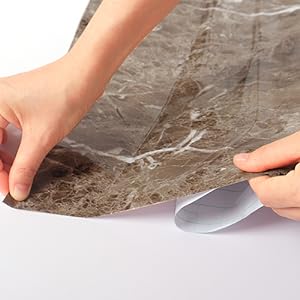
●Peel and Stick
●🏠DETAILS: Size 15.8 X 78.8 Inch, total 8.65 sq.ft (40cmX2m), Self adhesive (No glue needed). Made of aluminum vinyl, silver stainless steel contact paper peel and stick, oil-proof, waterproof. removable.
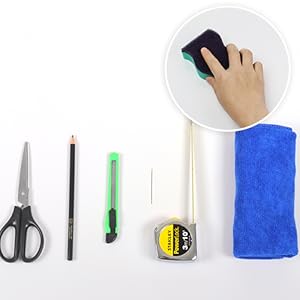
●🏠DIY FREELY: Trimming gridlines on backing paper for precise measurements, cut to any sizes. Stainless steel contact paper renders a modern and classy look to old kitchen cabinet, counter top, table, and variety of other household appliances, including refrigerator, dishwasher, microwave, etc
●🏠All-PURPOSE: Contact paper for appliances, heat resistant contact paper for countertops, stainless steel wallpaper for kitchen, adhesive shelf liner for kitchen cabinets, peel and stick stainless steel for refrigerator wrap, dishwasher covers for the front, fridge wraps for door, stainless steel sheet for kitchen wall, stainless steel countertop for stove, stainless steel backsplash for stove, alternative to stainless steel paint.
●🏠HEAT RESISTANT CONTACT PAPER: It’s heat resistant up to 170 degrees Farhenheit! It resistant to heat and water, so the silver metallic contact paper could be widely used for kitchen backsplash, countertops, behind stove, appliances. Please clean and dry the surface really well. Any dust or grease left on the countertop would make it challenging for the paper to smooth.
●🏠USED: Contact Paper for kitchens, appliances, countertops, dishwasher cover, kitchen cabinets, refrigerator, fridge covers, dishwashers, dryer, backsplash behind stove, stainless steel trim, stainless steel sheet metal roll, kitchen stove, freezer, kitchen cabinets, kitchen shelves, countertop, mini fridge, dorm, locker, small refrigerator, rv refrigerator, aluminum sheets, stainless steel strips, pantry, table, crafts, shelves, metal sheet, drawers, apartment ,office decor
[15.8x394 Inch]

[u200E15.8x590 Inch]

Description
ATTENTION
Stainless steel contact paper made of aluminum & vinyl that imitates the look of brushed nickel, not real stainless steel sheet. It expect your 100% patience to intall, thank you.

Peel and Stick, Waterproof, Removable
Used:
-Fridge, dishwasher, refrigerator, freezer, mini fridge, washer, kitchenette, gas range, metal backsplash, microwave, dryer, stove, kitchen appliances, kitchen drawer, kitchen shelves, kitchen backsplash, countertops, kitchen trash can, kitchen sink, kitchen counter, table, kitchen cabinet, cupboard, pantry, shelves, Walls, counter, bedside tables, nightstands, wardrobes, accent walls, dresser drawer, closets, TV stand, vanity, windows privacy, crafts, book covers, desk cover, door, windows etc.
-Kitchen, Bathroom, Bedroom, Apartment, Living room, College, Dorm room, Farmhouse, Industrial, Playroom, Cabin, Cubicle, Lake house, Laundry room, Entryway, Office decor etc.
Stainless Steel Contact Paper
|
|
|
|
|---|---|---|
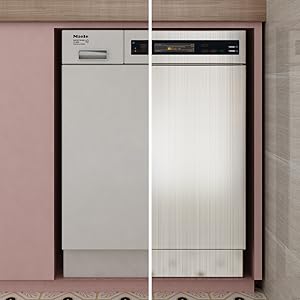
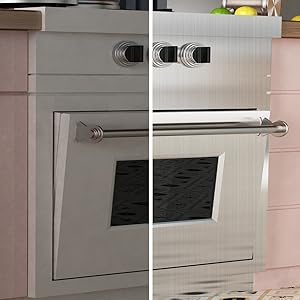
Peel and stick stainless steel dishwasher cover |
Stainless steel contact paper for appliances |
Refrigerator wrap |


|
|
|
|
|
|---|---|---|---|
How to install ?Installation guide come packed with wallpaper roll. Kindly unpack it carefully. Stainless steel look wallpaper is similar with real metal finish, please careful to avoid making crease before stick. |
Is it wide enough ?It is 15.8 inch wide. If the surface going to be covered is wider. please kindly overlap the edge of contact paper to cover whole item, the seam is invisible. or below have wider width contact paper for choose. |
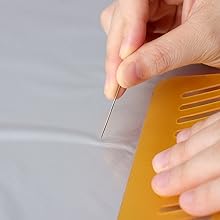
Wrinkles or bubbles ?Incorrected installation would form bubbles or wrinkles, please take your time to install. If bubbles do occur, please use a small pin to poke the bubble and smooth down from edge toward hole. |
Can stick on textured wall ?Textured walls dips, holes, and gaps reduce the surface area that can contact the wallpaper. The wallpapers will fall down easier than on flat walls, please read below tips before stick-on textured wall: 1. Sand your walls into smooth & dust-free before stick on wallpaper. Or 2. Spray 3M adhesive(or liquid paste) to fill in the gaps & other low spots on wall to make sure sticky wallpaper good attached to your walls. |


|

|

|

|

|

|
|
|---|---|---|---|---|---|---|
| Glossy Red Wallpaper | 24 Inches Wide Stainless Steel Contact Paper | 15.8 Inch Marble wallpaper Self Adhesive | 36 Inch Extra Wide Stainless Steel Wrap | Black Marble Wallpaper | Dark Wood Adhesive Paper | |
| Customer Reviews | 1,111
| 546
| 793
| 6,455
| 3,668
| 2,868
|
| Price | $8.88 | $29.99 | $9.99 | $59.99 | $8.99 | $9.98 |
| Waterproof | ✓ | ✓ | ✓ | ✓ | ✓ | ✓ |
| Removable | ✓ | ✓ | ✓ | ✓ | ✓ | ✓ |
| Peel and Stick | ✓ | ✓ | ✓ | ✓ | ✓ | ✓ |
| Where was wallpaper used ? | Hallway, kitchen, bathroom, bedroom, reception room. walls, counter, furniture, countertops, desk, table, laundry room, powder room, kids room, drawers, dresser, cuboard, backsplash, dining room, cabinets, vanity. | Kitchen, fridge, refrigerator, freezer, dishwasher, kitchen appliances, bathroom, counter, furniture, countertops, desk, table, laundry room, powder room, kids room, drawers, dresser, cuboard, backsplash, dining room, cabinets. | Hallway, kitchen, bathroom, bedroom, reception room. walls, counter, furniture, countertops, desk, table, laundry room, powder room, kids room, drawers, dresser, cuboard, backsplash, dining room, cabinets, vanity. | Kitchen, fridge, refrigerator, freezer, dishwasher, kitchen appliances, bathroom, counter, furniture, countertops, desk, table, laundry room, powder room, kids room, drawers, dresser, cuboard, backsplash, dining room, cabinets. | Hallway, kitchen, bathroom, bedroom, reception room. walls, counter, furniture, countertops, desk, table, laundry room, powder room, kids room, drawers, dresser, cuboard, backsplash, dining room, cabinets, vanity. | Hallway, kitchen, bathroom, bedroom, reception room. walls, counter, furniture, countertops, desk, table, laundry room, powder room, kids room, drawers, dresser, cuboard, backsplash, dining room, cabinets, vanity. |