Feature(may vary by option.)
●Automatically locks and unlocks the gate when the Automatic Gate Opener is activated.
●They are suitable for swing gate and perfect for all driveway gates made by steel, wood, vinyl, plastic and shaped as panel,Able to protect your gate in bad weather.
●The electric lock adds reinforcement to prevent against unwanted intrusion on gate systems. Weather-resistant for all seasons of the year. Manual Keys are included to enable manual operating during power outage or when you lose the remote. Higher quality designed plastic-spraying surface makes the lock more durable and reliable.
●Simple to install, includes all the necessary components for installation.
●Package include:1* Lock with 5 metre cable,1* Lock recevier,1* Clevis Pin,1* Plug pin,1* Spacer,2* Lock key (manual release). Any questions? Please do not hesitate contact the seller E-mail ( smart02@x-house.net ) for help. ONE-YEAR-Warranty !!!!
[Exit Wand]

[Electric Gate Lock]

Description


Multi-Functional control board
with a multi-functional DS33A control board
Help to be compatible with other brands of gate door openers
This small control board 12-24 Volt AC/DC powered relay, you can use it for other gate/garage door operator brands. The Automatic Electric Lock unlocks and locks automatically as an electronic gate is activated to open and close (depend on standard 12V/24V gate outputs).
The blue and white adjustable resistance on the board is used to adjust the delay time:The minimum is 2 seconds counterclockwise and the maximum is 6.5 seconds clockwise.
When the door LOCK is working, the DS33A will power on, the relay absorbs and closes, and the delay begins. When the delay time reaches, the relay is disconnected.
DS-PT Automatic Electric Lock

Technical Parameter
- Working voltage: 12V/24V
- Item Dimensions LxWxH 8.39 x 4.02 x 2.09 inches
- Protection Class for the Lock Kit: IP 44 –Weatherproof, suitable for outdoor use
- Pulse to Open Lock: 3 Sec
- Operating Current: 2.5 A
This manual shows two examples of the most common installations, and should provide insight into most
other application
Product Advantages
√ Easy to install
√ Suitable for all types of gates
√ Can work in inclement weather
√ Not easy to damage
√ Up to 10 years of use
PLEASE NOTE : Because of the various mounting applications, no mounting hardware is provided with the
Automatic Gate Lock. All necessary mounting hardware can be obtained from your local hardware store; all
other hardware is provided.
1 TO 1 Service: When you encounter problems during Installing ,we will provide support immediately
|
|
|
|
|---|---|---|
Safe to UseThe electric lock adds reinforcement to prevent against unwanted intrusion on gate systems. Weather-resistant for all seasons of the year. Manual Keys are included to enable manual operating during power outage or when you lose the remote. Higher quality designed plastic-spraying surface makes the lock more durable and reliable. |
Clever DesignThe electric lock uses Three Rolling Teeth closure design, which makes the door lock easier and firmer to close,The Swing Lock requires a fraction of the force that outlines the industry standard for the closing of gate locks. |
High-Quality CoverIP68 gland is used to protect the cable and strengthen waterproof !The steel material reduces the weight at the end of the gate. There is no need for a second remote control because the ET24 electronic lock will automatically activate before your door is opened, and will be locked after the door is closed. Simple DIY installation |


Electric Lock Installation Guide

STEP 1:
Remove the front end of the actuator that is attached to the gate bracket with a clevis pin and clip pin. Wire tie of clamp the front end on the gate to support it. This will enable you to swing the gate manually while installing the gate lock. Please note that the front ends of both actuators need to be disconnected for dual gate systems.
STEP 2:
Swing the gate to the closed position. Find the best position to mount the lock and the receiver. It must be level with the actuator. The lock should be mounted on a gate cross member or other solid part of the gate surface.
STEP 3:
Position the lock in an approximate mounting position on a cross member or other mounting surface that is level with the actuator. The lock can be moved into an exact position later in the installation process.
STEP 4:
Find a location on the fence post level with the gate lock and temporarily tie the lock receiver provided. Slide the gate lock back and forth until it lines up with the receiver. The pin holes on the receiver must line up with the slot in the lock. Once this position is achieved, mark the post through the center of the two slots in the receiver.
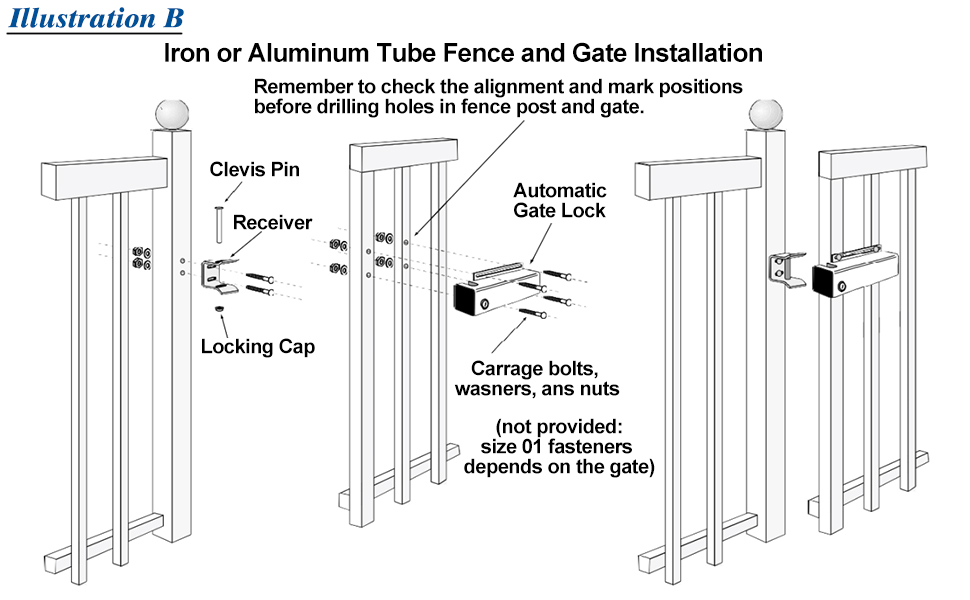
STEP 5:
Drill through the marks on the post and attach the receiver with the mounting bolts, washers and nuts that you have purchased.
STEP 6:
The gate lock must now be permanently mounted to the gate cross member or gate surface. Make sure that the lock is aligned with the receiver and mark holes on the gate through the upper and lower slots on the lock.
STEP 7:
Drill holes through the marks and attach the lock to the gate surface with the appropriate hardware. Do not use bolts greater than 5/16 inch diameter as they will not It through the slots.
STEP 8:
Insert the clevis pin through the holes in the receiver and hammer the locking cap onto the bottom of the pin.
NOTE: It may be easier to remove the receiver from the post and then hammer the pin into the blocking cap on a hard surface. Then the receiver can be remounted to the post.

|

|

|

|

|
|
|---|---|---|---|---|---|
| Universal Garage Door Keypad | Universal Garage Door Remote | Garage Door Remote | Garage Door Remote | Replacement for Liftmaster Gear | |
|
|
|||||
| Customer Reviews |
3,275
|
3,275
|
619
|
619
|
439
|
| Price | $22.79 | $13.99 | $16.99 | — | $17.49 |
| Frequency | 310-390 MHz | 310-390 MHz | 315 MHz | 390 MHz | |
| Compatible Learn Button | Yellow/Purple/Orange/Red/ Green | Yellow/Purple/Orange/Red/ Green | Purple/Yellow | Red/Orange/Yellow | |
| Compatible Brands | Chamberlain, LiftMaster, Craftman, Genie, Stanley and more. | Chamberlain, LiftMaster, Craftman, Genie, Stanley and more. | Chamberlain, Liftmaster, Crafsman | Chamberlain, Liftmaster, Crafsman | Compatible with chamberlain, sears, craftsman and lift master 1/3 and 1/2 HP chain drive models |
| Dip Swtich | ✓ | ✓ | |||
| Visor Clip | ✓ | ✓ | ✓ |